This is an old revision of the document!
Xfwm4 主题 how-to
介绍
Xfwm4 是 Xfce4 的原生的窗口管理器,它使用一种简单而灵活基于像素图的主题引擎,使用 .xpm 格式的图像。Xfwm4 还使用一个文本文件,配置其他选项(见 themerc 小节)。此外,你还可以选用 gtk 主题颜色,这将文档在 gtk 颜色小节说到。
主题的存放位置
在 Xfwm4 版本 4.0 中,主题搜索在下列目录:
- 用户主目录/.themes/xfwm4/theme_name(例如:
/home/joe/.themes/xfwm4/b5) - 系统共享数据目录/xfwm4/theme_name(例如:
/usr/share/xfwm4/themes/b5)
在 Xfwm 版本 4.2 中,主题的存放位置是符合标准的,在下列目录搜索:
- 用户主目录/.themes/theme_name/xfwm4(例如:
/home/joe/.themes/b5/xfwm4) - 系统共享数据目录/themes/theme_name/xfwm4(例如:
/usr/share/themes/b5/xfwm4)
标题栏修饰
因为窗口可以处于激活的1)或者非激活2)两种状态。所以 xfwm4 使用相应命名的像素图,例如,title-1-active.xpm 或者 title-1-inactive.xpm。
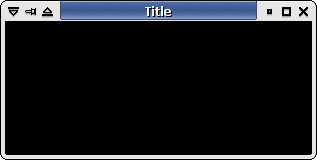
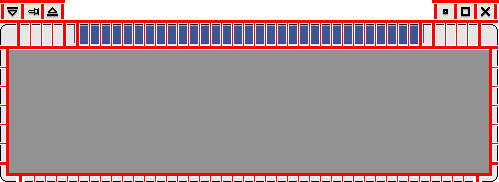
对于标题栏的修饰,xfwm4 使用 5 张名为 title-1-active.xpm 到 title-5-active.xpm 的像素图以及 top-left-active.xpm 和 top-right-active.xpm 组成两端的角如下图所示。
非激活 xfwm4 窗口像素图使用一样的命名约定,只是单词换为 inactive;例如,title-1-inactive.xpm。
标题文字的颜色和阴影选项,对齐方式等在 themerc 文件中设置(在 themerc 小节详述)。
窗口侧边和底部
每一个窗口的侧边由两个像素图构成。左侧边的像素图叫 left-active.xpm 和 bottom-left-active.xpm 。右侧边(当然)也就是由 right-active.xpm 和 bottom-right.active.xpm 构成。
窗口底部的控制条由 bottom-active.xpm 和 bottom-inactive.xpm 构成;当窗口大小改变时它们会被重复填充。
注意:这些像素图也构成鼠标控制柄,当你决定它们需要多少像素宽度时,请记住这一点(特别是左下和右下像素图,它们构成窗口主要的缩放控制柄)。
Xfwm4 按钮
xfwm4 最多可以使用 6 种动作按钮 —— stick(sticky 窗口),菜单,折叠,隐藏,最大化和关闭。
按钮有激活的3)或者非激活4)和按下三种状态。如图 3 所示: AbiWord 图片 menu-active.gif AbiWord 图片 menu-inactive.gif AbiWord 图片 image_2.gif
Xfwm4 也使用切换按钮,来指示按钮是否被切换 —— 见图4 AbiWord 图片 stick-active.gif AbiWord 图片 stick-inactive.gif AbiWord 图片 stick-pressed.gif AbiWord 图片 stick-toggled-active.gif AbiWord 图片 image_3.gif AbiWord 图片 stick-toggled-pressed.gif
themerc 文件
xfwm4 使用 themerc 这个文本文件设置一些,比如标题文本的颜色,button_spacing 或者 button_offset 等等特性。它包含在主题的像素图的文件夹中。
按钮布局
也可以为特定主题定义固定的按钮布局。但需要提醒应该避免强制特定的按钮布局或者标题对齐及其他降低用户选择的设定(除非主题真的需要那样,比如下面会提到的 b5 主题)
# button_layout :
#    O = Option menu
#    T = Stick
#    H = hide
#    S = shade
#    M = maximize
#    C = close
#    | = title
button_layout=OTS|HMC
现实的例子是,B5 主题只使用了关闭按钮。也就是 themerc 文件中写的是button_layout=C|
标题宽度
另外一个需要在 themerc 文件中设置的项为 title_full_width。这个布尔值确定怎么安排标题栏中的像素图。
当设置为 true 时,中间的像素图被重复填充整个窗口宽度:
当设置为 false 时,中间的像素图被重复填充到适合标题的宽度:
文本阴影
通过设置 title_shadow_active(激活窗口)或 title_shadow_inactive(对其他非激活窗口)为标题文本添加一个阴影。
可用的值为:false,true,和 frame。
标题偏移
标题文本的位置,可以用偏移量来调整以适应主题设计。水平和垂直偏移的值可以用下面的设置项来调整:
- title_horizontal_offset
- title_vertical_offset_active
- title_vertical_offset_inactive
按钮偏移和间距
同样地,可以通过使用“按钮偏移量”设置按钮的水平移动。这没有什么用,偏移值是相对的应用程序窗口的边框的,而不是 frame 边框。
button_spacing 值设置按钮之间的像素数。
GTK 颜色 pickup
你肯定已经注意到,当使用安装 xfwm4 的默认主题,主题可以 “pick-up” GTK 主题颜色。不只是运行 GIMP 然后画按钮。大多数主题使用颜色符号表。这意味着 xpm 文件,必须能手工打开编辑。
颜色符号表如下:
| 名称 | 描述 |
|---|---|
| active_text_color | 激活窗口的标题文本颜色 |
| inactive_text_color | 非激活窗口的标题文本颜色 |
| active_border_color | 很少使用,一般设置为黑色 |
| inactive_border_color | 同上 |
| active_color_1 | 激活标题的背景颜色 |
| active_color_2 | 激活窗口的背景颜色 |
| active_hilight_1 | 激活标题的浅颜色,表现 3D 样式 |
| active_hilight_2 | 激活窗口的浅颜色 |
| active_mid_1 | 激活标题的深一点的颜色 |
| active_mid_2 | 激活窗口的深一点的颜色 |
| active_shadow_1 | 激活标题的深颜色,表现 3D 样式 |
| active_shadow_2 | 激活窗口的深颜色 |
| inactive_color_1 | 非激活标题的背景颜色 |
| inactive_color_2 | 非激活窗口的背景颜色 |
| inactive_hilight_1 | 非激活标题的浅颜色,表现 3D 样式 |
| inactive_hilight_2 | 非激活窗口的浅颜色 |
| inactive_mid_1 | 非激活标题的深一点的颜色 |
| inactive_mid_2 | 非激活窗口的深一点的颜色 |
| inactive_shadow_1 | 非激活标题的深颜色,表现 3D 样式 |
| inactive_shadow_2 | 非激活窗口的深颜色 |
这些符号在运行时被实际的色彩值替换,窗口的边框自动继承 GTK 主题的颜色。 xfwm4 原生使用的 xpm 文件格式,不过是一个纯文本文件,你可以用你喜欢的文本编辑器编辑它。
From Wikipedia, the free encyclopedia.
XPM (X PixMap) is an ASCII image format used by the X Window System. It was created in 1989 by Daniel Dardailler and Colas Nahaboo working in Inria Laboratories, France, and was later enhanced by Arnaud Le Hors. It is intended primarily for creating icons, and supports transparent color. It has a simple structure, deriving from the earlier XBM syntax. It can be created and manipulated using any text editor and can be included in a C language file.
Therefore, if you open an xpm file with your favorite text editor, you'll see something like this:
/* XPM */
static char * title_2_active_xpm[] = {
"5 21 10 1",
"       c None",
".      c #000000",
"+      c #FFFFFF s active_hilight_2",
"@      c #D5D6D5 s active_color_2",
"#      c #4B58A2 s active_shadow_1",
"$      c #525FAB s active_color_1",
"%      c #848FD6 s active_mid_1",
"&      c #B4BAB4 s active_mid_2",
"*      c #949594 s active_shadow_2",
"=      c #FFFFFF s active_hilight_1",
".....",
"++++#",
"@@@@#",
"@@@@#",
"@@@@#",
"@@@@#",
"@@@@#",
"@@@@#",
"@@@@#",
"@@@@#",
"@@@@#",
"@@@@#",
"@@@@#",
"@@@@#",
"@@@@#",
"@@@@#",
"@@@@#",
"@@@@#",
"@@@@#",
"@@@@@",
"@@@@@"};
Not going too deep into the details of the XPM format, an XPM image is made of different sections, the values that describe the format of the image, the colors that compose the image, the pixels (and there is also the extensions, but it's safe to ignore them for now)
A character is assigned to each color of the image (if the image has more colors than available charaters, then more than a single character can be assiged to a colors). If a color symbol is specified, the given color will be ignored and replaced by the corresponding color in the color symbol table.
To get the gtk colors applied to your theme, you need to edit the XPM files and add the proper color symbols to the color definition table.
"       c None",
".      c #000000",
"+      c #FFFFFF",
"@      c #D5D6D5",
"#      c #4B58A2",
"$      c #525FAB",
"%      c #848FD6",
"&      c #B4BAB4",
"*      c #949594",
"=      c #FFFFFF",
must be changed to
"       c None",
".      c #000000",
"+      c #FFFFFF s active_hilight_2",
"@      c #D5D6D5 s active_color_2",
"#      c #4B58A2 s active_shadow_1",
"$      c #525FAB s active_color_1",
"%      c #848FD6 s active_mid_1",
"&      c #B4BAB4 s active_mid_2",
"*      c #949594 s active_shadow_2",
"=      c #FFFFFF s active_hilight_1",
As a matter of fact, “thinking” of the gtk colors as early as drawing the theme can save a lot of time in this phase. If you use the exact same color across all the pixmaps, you can use the Search/Replace functionnality of the text editor to add the color symbols. You could even use a tool such as “sed” to perform mass changes in all the XPM files of the theme.
Xfwm 4.2 new functionality
As simple as it is, the color symbol replacement table of the XPM format is not powerfull enough to achive the nice color gradients seen in most recent themes.
Xfwm 4.2 includes yet another functionality that gives real nice result while being still compatible with the previous theme format: It composes the final image from the XPM file and it colors replacement table, and another PNG file with transparency, if present.
The names of the PNG files are identical to the names of the corresponding XPM files, with the “.png” file extension (ie title-1-active.png, top-right-inactive.png, etc.). The PNG file is by no mean required, if it's not present, xfwm4 won't complain, but if there is a PNG image of the same name as the XPM image, and if that PNG has an alpha channel (ie, it has semi-transparent pixels) then the PNG image will be automatically layered on top of the XPM image to produce the final image.
This technique has several advantages:
- It's fairly simple from a theme designer point of view, most people are working with similar techniques when composing themes with tools such as The GIMP.
- It's backward compatible with xfwm4 from Xfce 4.0, the PNG files are just ignored by xfwm4 4.0.
Conclusion
I hope this small “how-to” for creating themes for xfwm4 will help you design your own themes. It would be great if you could share your themes with others on http://www.themedepot.org (which is the prefered site for xfce related themes) or from http://themes.freshmeat.net.
you can also find xfce theme at http://www.xfce-look.org
List of frame and button part names
This is a list of all possible part names in a decoration, so you can easily copy and paste them. (Tip: if using Firefox hold Ctrl while dragging, to select cells instead of lines. 
| Active | Inactive | Pressed (buttons only) |
|---|---|---|
| menu-active | menu-inactive | menu-pressed |
| shade-active | shade-inactive | shade-pressed |
| stick-active | stick-inactive | stick-pressed |
| hide-active | hide-inactive | hide-pressed |
| maximize-active | maximize-inactive | maximize-pressed |
| close-active | close-inactive | close-pressed |
| top-left-active | top-left-inactive | |
| title-1-active | title-1-inactive | |
| title-2-active | title-2-inactive | |
| title-3-active | title-3-inactive | |
| title-4-active | title-4-inactive | |
| title-5-active | title-5-inactive | |
| top-right-active | top-right-inactive | |
| right-active | right-inactive | |
| bottom-right-active | bottom-right-inactive | |
| bottom-active | bottom-inactive | |
| bottom-left-active | bottom-left-inactive | |
| left-active | left-inactive |
Credits
This how-to has been started by Drewbian (drewbian at tsn dot cc) and later modifed by Olivier Fourdan (fourdan at xfce dot org).


